Tuesday, May 18, 2010

Living Room Makeover!

Since we moved here 14 years ago, I have hated the living room! It was wood paneled and the fireplace was red brick with awful black grout. So Brady Bunch, so completely "Lodge Gone Wrong." It was like a big dark hole and although there are two large windows in the room, all my plants died in there. Probably from sadness.
 
I tried numerous times to get my husband to agree to let me re-do the room, but he never wanted me to paint the wood or the bricks. Our oldest son's college graduation was coming up, we would be having a party for him, and I really wanted the "brown room" to go away. So,I researched how-to's online and with constant nagging, he gave in. And yes, I would have done it even if he hadn't agreed, but I always start out by attempting harmony first, then if that doesn't work, I go for mutiny.
 
Room prep:
I gently scuffed up the paneling with fine sandpaper first so the paint would adhere better. Then I washed the walls with vinegar and water and vacuumed the bricks. I used Behr Paint's Premium Plus Ultra...it's paint and primer in one and the walls and the fireplace each took only 2 coats of paint each. Wall colour: Rainwashed (a soft blue/gray that reminds me of the sky after a rain...calm, soft and relaxing!)
Fireplace and ceiling colour: Serengeti Sand (sort of beige-y with a hint of orange/yellow...warm!)
 
Befores:
(there was also a gargantuan wooden bookcase that could sleep 6 people in the room, but we got that moved out before I took these photos. It seriously weighed about 500 pounds!)
Afters:


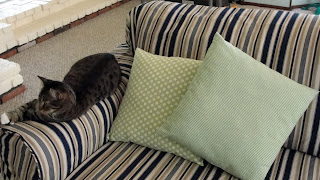
The entire makeover cost under $250, too! The paint was $120, the couch slipcover was $50 from Overstock.com, the recliner slipcover was $30 on Amazon.com, the green sheers were $10 from Target and the fabric for the couch pillows was $12 from Joann Fabrics. As the room was mostly blues and vanilla latte colours, I brought in the green sheers and pillows, pattern mixing the pillows. The rest of the decorations were in various places in our house, so I just brought them all together. I call it "Victorian Beach House" style and it's become my favourite room!

(the "after" shot of the fireplace came out too blue-y! The rest of the photos show the actual wall colour.)

Thursday, May 6, 2010

Red Cowboy Boots

I've been searching for a pair of red cowboy boots for several months. How cute would they be with summer dresses?! I had a hard time finding exactly what I wanted, plus I didn't want to spend $100 or more on a pair. I really wanted a used pair...nice and worn in already, but with a lot of life left in them. I finally decided to bid on a light brown pair on Ebay and take a chance on dyeing them red. I read a blog where someone had dyed a handbag with Fiebing's Dye, so I figured what the heck...I'm crafty, right? I won the Ebay auction and got the boots for $26 and they fit like they were made for me. Bonus! I ordered the dye and deglazer (removes any old finish and dirt from the leather) from an Ebay seller also (STECKSTORE) The handbag blogger said a whole bottle of dye was used for the bag, so I bought 2 bottles of red dye for the boots. I only used part of one bottle of the red dye and only about an inch and a half of the deglazer, so this puts my total cost at less than $35. I got some old rags and went outside. The deglazer SMELLS... you're gonna need more than a "well ventilated area", trust me! I cleaned one boot first and a fair amount of dirt came off. You're supposed to put the dye on while the leather is still damp from the deglazer. The dye comes with a dabber thingy and the dye is DRIPPY! A bit thicker than water, but not much. It reminded me of the mercurochrome my mom used to put on my boos-boos when I was little. (Whatever happened to mecurochrome? They probably discovered it's cancer causing or something, right?)I just rubbed the dye soaked dabber all over the boot until it was covered completely. Then I did the second boot and after about 10 minutes (not long) followed with a second coat of red dye. Then, per the instructions on the bottle, I rubbed briskly with soft cloth to remove excess dye. Not a lot came off. And that was it! Total time, maybe 20 minutes. Seriously. I wore them the next day and a bit of dye did rub off on my shin, but not much. I think I may have forgotten to briskly rub the inside of the boot where the pull up strap is, so that would explain the dye rub-off. So...if you're feeling adventurous, I highly recommend giving this a try! Maybe test it on some thrift store shoes first or something, but it was REALLY easy and it turned out exactly as I wanted, so GO FOR IT!

Wednesday, March 24, 2010

How to turn a sweater into a cardigan Tutorial

First off, it's been almost a year since I've updated this blog! I'm sure my 2 followers have missed me. ; ) Rest assured I've been keeping busy with all things craft and this project I did today totally screamed "SHARE!" and motivated me to log back into my blog (after recovering my forgotten password!)
I bought this sweater at a Kohl's sale a year ago. I loved the colour, loved the deep v-neck and loved the sale price of $5.00. I didn't even try it on, I just grabbed it on my way to the check-out. In the last year I've only worn it a couple times...the deep vee ended up looking weird with most tanks or tees underneath, so it mostly sat in the drawer. Last week, I made a cute dress with some $3.00 a yard cotton fabric from Walmart. I really wanted a blue cardigan to wear over it but I just haven't been able to find the right colour. Then I remembered this sweater and I thought "Well, I'm not wearing it much, I only paid 5 bucks for it, so.....let's cut it up!"
(am I cheap, or what? A whole outfit for under $12!)
First, I marked the sides with pins in 3 inch increments so I could use the yardstick to find the center of the sweater. Place the yardstick across the sweater (side to side) at each 3 inch interval and find the center by dividing the measurement; ie. 20 inches across= 10 inches to center. Pin along the center.
Once you've marked the center of the sweater, sew 1/8 inch from the center on each side of the center. So, now you have 2 parallel sewn lines. Cut up the front of the sweater between the two sewn lines.
I used this 7/8 inch grosgrain polka dot ribbon that I had in my stash. I heart all things polka dot and the colour matches the sweater perfectly!
Here's a neat trick for ironing something in half: fold the first 4 inches or so of the ribbon in half and insert a pin on your ironing board cover that is equal to that measurement.(here, it's a bit under a half inch) Insert the folded ribbon under the pin, place the iron on top and just pull the ribbon under the iron. The ribbon will fold in half as you pull it throught the pin and the iron will iron it flat! Amazing, right?
Next, pin the ribbon along the edges, making sure you get the folded edge of the ribbon right up against the cut edge of the sweater. At the ends, fold the ribbon under so the raw edge is hidden inside the fold.
Sew close to the ribbon edge and after a few stitches, check to make sure you're catching the ribbon with the stitching on the back side as well.
Whipstitch the folded ends closed.
Here's my model Heidi, modeling the dress and the sweater! (Why, yes, she is named after Heidi Klum and yes, I am a big Project Runway fan!)
I held the top closed with this vintage rhinstone clip-on earring, but you can also sew a loop and button closure at the top, too! Gah.......how freakin' easy is that?? It took longer for me to edit these pictures and type this than it took to actually do the project!
New life to a seldom-used sweater....sweeeeeeeeeeeeeeeet!

Friday, June 26, 2009

Stained Glass Pet Portrait

Rescue Village is a large pet shelter near me. A few times a year they have fundraising events and for their Chinese auction in February, I donated a gift certificate for a personalized stained glass pet portrait. The person who bid the highest on it contacted me and we chatted a bit about her pet, an English Springer Spaniel. I like to get to know about the pet's personality so I can make a panel that really reflects that. She told me that her dog was very dignified and so I chose a Tudor-style cross design for the background, using the regal colours of purple and gold.
When I am commissioned for a pet panel, they are normally sent through the mail, as the people who buy them usually live in other states. BUT...today I actually got to personally present this panel and it was a most gratifying experience for me!
Fittingly, we met at Rescue Village and as I unwrapped the bubble wrap from the panel, the dog's owner gasped and said "It looks just like him!!" She was just thrilled with the piece and even gave me a hug as we parted ways! I can't tell you what a gift it was for me to experience this joy first hand! To see the delight a piece of my artwork gave to someone was just beyond words. It's really a moment I'll remember. If I were a rich person, I would do this for free, just to experience that feeling!

Wednesday, June 24, 2009

Chandelier, reconstructed!

At the beginning of the month, I started this chandelier project. It's finished and hanging in my dining room and it looks MAH-VELOUS, darlings! The pictures really don't do it justice, so if you're ever in the neighbourhood, drop on by and I'll be happy to show it off!

Patty O'Furniture

Here's a couple of cheap plastic Adirondack chairs. We haven't used them much in the last couple of years because they really show the dirt and it's almost impossible to get them totally clean. I remembered reading in some home repair mag (we subscribe to several) about a new Krylon for plastics. It's called Fusion and I bought it at Walmart, paying under $4 a can. The colours are Blue Hyacinth and Gum Drop. They each took about 2.5 cans to completely cover and I used the rest of the purple can to spray these 2 flower pots, as well.
It was really easy to use...the can has a flexible spray nozzle that is easy to hold down and I just took them off in the yard, away from the cars and sprayed on a not-so-windy day. It dries to the touch in 15 minutes and is chip-resistant after 7 days.
A wicked easy and fast way to liven up your yard this summer!

Monday, June 8, 2009

Junk Drawer

I needed some address labels to mail some stuff and I knew we had some of those freebie ones you get in the mail from the Paralyzed Wildlife Christian Children's Heart Association Fund, so I had to open....
THE JUNK DRAWER!
WTF with the Junk Drawer? You know you all have one in your kitchen or maybe in your desk. Look at all that crap in there! What's in all those Ziploc bags, anyway? It just stands as a sad reminder that someone (probably me) at some point, tried to organize the Junk Drawer and failed. Are those Arby's coupons even VALID anymore? I can see the teenager at the drive thru window laughing at me as he hands the coupons back: "Uh...Ma'am..these expired in January."
Do we need TWO bottles of White-Out or FOUR things of Scotch Tape? And the pet brush! I was wondering where that was...one of the dogs probably HID it in there, knowing we rarely look in there. Scrap paper? A ruler? Something that looks like it may be epoxy? Enough batteries to power lower Manhattan? And, oh yeah...the address labels. See how they have Christmas designs?
Oy vey!